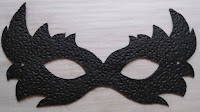
Although we may not be able to celebrate in person this year, the Mardi Gras celebrations continue in many ways. Try this easy tutorial to add some flair to your carnival traditions!
What you’ll need:
- 1 pack of black clay (or color of your choice)
- Mask template (hand-drawn or found online)
- Clay machine
- Tissue blade(s)
- Craft knife
- Acrylic roller (optional)
- Texture sheet (of your choosing)
- Plastic mask form (optional)
- Ribbon
- Poly-fil (optional)
- Embellishments (glitter, mica powders, crystals, etc.)
Directions:
1. Either draw or find a mask template online.
2. Condition 1 pack of black clay through the clay machine ending with a conditioned sheet of clay rolled out on the #3 setting.
5. Gently release the mask from the work surface with your tissue blade and place the mask on a quick release piece of parchment paper.
8. Cut small holes or slits on each side of the mask to attach the ribbon after baking.
9. Once embellished, place the clay mask on the plastic mask form (found at your local craft store) or gently shape the mask and bake on poly-fil.
Note: For best results when using the mask form, shape the clay mask to the form and then place them both in a 8" x 8" (or similar) baking pan filled with poly-fil. By facing the form upright, you reduce the chances of the mask slipping off the form and breaking during the baking process.
10. Bake approximately 20-25 minutes at 275°F. You can bake the full 30 minutes, but watch closely in case of cracking.
11. Let the mask cool on the mask form or poly-fil.
12. Once cooled, add enough ribbon to tie the mask around your head.
There are no limits to your creativity—play with colors, clay techniques, mask designs, and other embellishments to create a festive mardi gras mask.
Laizzez Les Bons Temps Rouler!


No comments:
Post a Comment