
Just in time for the holidays, our December tutorial features the classic peppermint candy in a cane!
Whether you call them peppermints or candy canes, these classic red and white holiday candies lend themselves perfectly to beautiful clay creations!
What you'll need:
- Clay machine
- Circle cutter (we used one that's 1.5" in diameter)
- 1/4 pack of red clay
- 1/4 pack of white clay (you can use pearl or frost white glitter, too)
- Tissue blade (the rigid one)
Directions:
1. Condition both colors of clay with your clay machine on the thickest setting. Note: red clay likes to bleed, so work with your white clay first and be sure to clean your hands and tools often.

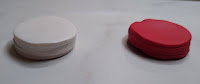


6. Now you'll begin to assemble the pieces. Take one red piece and place a white piece right next to it—keep this alternating patter to recreate the circle. Note: be sure to gently press the pieces together so they stick and try to avoid creating any gaps in the center.
7. Once you have placed all 8 pieces, gently begin to reduce your cane. Try not to twist the cane as you reduce.
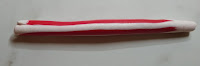
8. There is no set diameter or size for this cane—just whatever works for your the piece you're intending to make.

Once cooled, you can sand and add any findings to complete your holiday peppermint project!
No comments:
Post a Comment